| |
Sample Technical
Sheet
|
All products on our Products
Page are supported with a user friendly technical sheet, written in plain
English. They describe uses of all the components where they are used, why you
should use them, and how to use them as well as much more.
Click
Here to access the Sign One Technical Sheets.
Provided below is an example technical sheet for one
of our products:
| |
ITEM: P1485R
SIGN ONE POST 80mm ( 3 1/4" )
P1484R
SIGN ONE INFILL AND FRAME
DESCRIPTION: 80mm
( 3 1/4" ) post and frame step by step guide. See items individually for details on their
features.
CONSTRUCTION & ASSEMBLY GUIDE
No.1 - STANDARD FRAME:
|
|
| |

|
|
| |
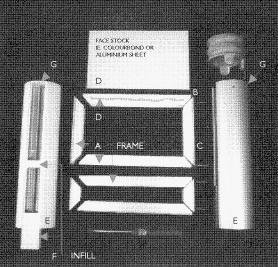
Step 1 A. Cut frame to required length and mitre corners to 45o
Step 2 B. Notch back horizontal pieces to allow clearance
into opening recess (required for sliding into posts, not required when using frame
alone)
Step 3 C. Using the Vee groove in the back of the frame as
centre, drill hole to align with screw flute and using a metal thread 8 gauge screw
assemble sign frame.
Step 4 D. Cut face stock and allow clearance to slide into
post and then run a bead of suitable premium glue along recessed fin (see 4409RRR)
Step 5 Carefully place sign face to recessed fin and press
down firmly, cleaning off excess glue if required.
Step 6 E. Determine post lengths and cut
to size
Step 7 F. Cut the infills to required length, small
sections can be cut to provide spacers between sign panels " Hot Tip" If
you are concreting posts into the ground, cut a small infill and screw it into a position
level with the top of the hole. This will leave the bottom of the post open to allow the
concrete to flow into the cavity which enhances the installation and saves infill, whilst
also allowing removal of infill for cutting down to allow space when adding signs!
Step 8 Slide your finished sign frame into recess fin of
sign post and then slide in infill. Another " Hot Tip" is to again use a
small section of infill at the bottom of the post to close off and hold in place
assembled items. (for ease of assembly and transport)
Step 9 G. Using your selected cap, either screw flat cap to
top of post by utilising screw flute or press in cast aluminium cap into top of post
and drill post to suit cap prongs.
|
|
| |
APPLICATIONS: |
|
| |

|
|
| |
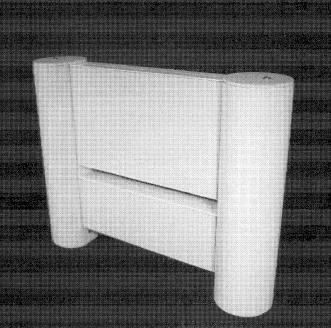
Finished assembled Sign One showing flat caps and multipanels, please note clear lines
with no gaps. This minimises cobwebs, spiders and insects, keeping your sign clean. Its
flat faces provide graphics in your chosen media – vinyl graphics, digital printing,
screen printing and engraving to name but a few. Engineers
Specification should be sought to ensure size/suitability of the system by the user, prior
to use.
GRAPHICS: Text and graphic techniques we recommend include
– pre spaced vinyl computer cut lettering. Premium brands screen printing, engraving
and plain infilling, photo etching, laser engraving and digital image printing. (see
4409EEE)
Copyright © Sign One Pty Ltd 1998
4409EE |
|
|
|


