|
Saving money on making signs |
A step by step guide to making a
Clipsin frame. |

|
|
|
|
Manufacturing Safety First |
|
Staff experience
Ensure the suitability and experience of your staff and their
training to fabricate and install our sign systems prior to using.
Safety of workplace
Ensure you have evaluated the equipment for safety guarding and
your facilities are of a suitable type to work with our sections.
Personal protection
equipment
Please provide all necessary personal protection equipment to
your staff including ear protection and eye protection. |
 |
|
|
|
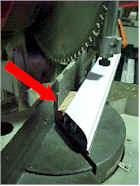
Cutting the
sections
|
|
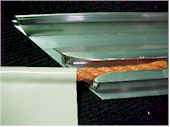
When cutting assemble both base and cap
together, to ensure the saw cut action doesn�t close over and alter the
mitre, place a packing block timber 19-20mm(1.5�) in the front gap of
the cap and base. Clamp in position then cut.
|
|
|
|
|
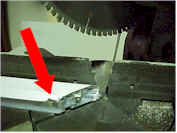
Cutting tip
|
|
When cutting cut from the back of the
section, the part that forms the hinge as this will ensure that the front
of the cap doesn�t catch in the saw blade when cutting short lengths.
|
|
|
|
|
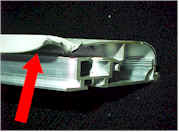
After cutting
|
|
Remove cap and base from saw. Clean
working area. Select suitable working area and lay base section face down
to insert corner brackets. Insert corners into rear slot in alum section,
and tighten screws.
|
|
|
|
|
After cutting tip |
|
When tightening screws ensure not to over tighten as you may strip the
thread. If you are going to transport the Clips-in frame leave the second
screw loose, for assembly on site at a latter time.
|
|
|
|
|
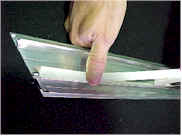
Assemble the
corners
|
|
Once you have a corner assembled,
tighten
screws while checking the mitre is aligned.
|
|
|
|
|
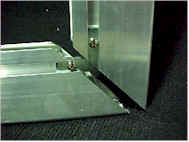
Strengthening the
corners
|
|
In some applications such as large scale
sign frames corners gussets are suggested. These are alum. Corner gussets
with stainless steel T bolts which slide into the rear slot on the back of
the base, allowing easy break down for transport and ease of assembly on
site.
|

|
|
|
|
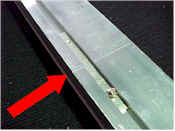
Straight joins
|
|
In the case of a straight join assemble
sections and tighten screws while checking the straight joint is aligned.
|
|
|
|
|
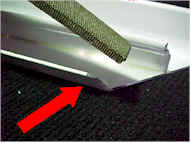
Filing the cap
|
|
Minor filing ensures the systems ease of
use. File the hinge section of cap square, to allow ease of placement into
base when frame assembled. File the inside front corner of cap rounded, to
stop from marking or damaging the sign face material.
|
|
|
|
|
Filing the base for
hemmed sign faces
|
|
Only required if your are inserting
hemmed sign faces. Minor filing ensures the systems ease of use. File the
T-slot section of the base to a smooth round. This will assist if you are
inserting hemmed sign faces into the rope track.
|

|
|
|
|
Hemmed sign face
tips
|
|
Only required if your are inserting
hemmed sign faces. When you install a large sign face you may use the
optional rope track. Hem via stitching or double sided tape with 10mm (3/8�)
poly rope. Extra slip may be obtained by using spray lubricant or similar.
|
|
|
|
|
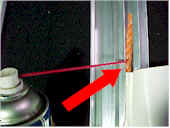
Apply double sided
tape
|
|
Apply recommended double sided tissue
tape to the top of the rope slot section of the base. The rope slot is in
2 parts apply tape to the rear sloping section nearest to the back of the
base.
|

|
|
|
|
Double sided tape
tips
|
|
The recommended double sided tissue tape
is nominated in our price list. The use of this tape allows the sign maker
the ability to pre tension the sign face, as the tape holds the sign face
in place while you adjust the face for removal of wrinkles.
|
|
|
|
|
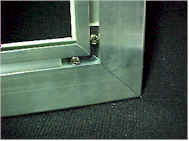
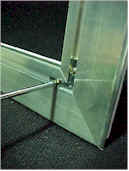
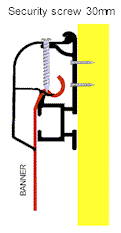
Security Fixing of Clips-in cap |
|
When installing large clips-in frames you will need to
ensure the cap is securely fixed to the base to ensure long term tension
of the sign face. On the back of the cap there is a groove in the
extrusion by installing a 30mm (13/8") screw through the cap, into
the base as shown this locks the cap in position. We recommend this for
sites where access may be a problem if maintenance is required.
|
|
