|
Installing a sign face to a Clipsin sign
frame
|
|
A step by step guide to installing your sign face or
banner to a Clips-in frame. |

|
|
|
|
Installing -
Safety First |
|
Staff experience
Ensure the suitability and experience of your staff and their
training to fabricate and install our sign systems prior to using.
Safety of workplace
Ensure you have evaluated the equipment for safety guarding and
your facilities are of a suitable type to work with our sections.
Personal protection
equipment
Please provide all necessary personal protection equipment to
your staff including ear protection and eye protection. |
 |
|
|
|
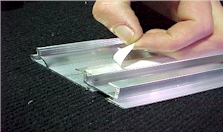
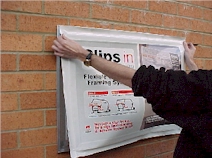
Remove double sided
tape liner |
|
Remove the liner from double sided
tissue tape . We are assuming here that the recommended double sided tape
has been placed on the rope slot on to the rear sloping section nearest to
the back of the base.
|
|
|
|
|
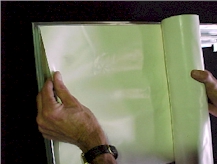
Sign face
positioning |
|
Roll up the sign face leaving around
1000mm (3’4”) to position the alignment of the sign face to the frame.
Align sign face with top edge and end of frame, ensure the the sign face
will run along the frame square and true.
|
|
|
|
|
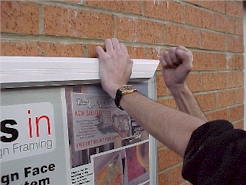
Adjusting and tensioning sign face |
|
Press the sign face firmly onto the
double sided tape. The sign face is now ready to apply tension. Starting
in the middle of the bottom edge pull down not out over the tape. Only
minor tension needs to be applied.
|
|
|
|
|
Pre tension sign
face |
|
Now working on the sides repeat the
process.The aim is to finish with the sign face tight but not drum tight.
The desired affect is a taught wrinkle free sign face. Remember the caps
will apply an overall extra tension when in place.
|
|
|
|
|
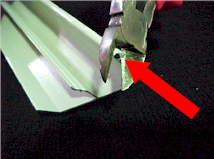
Remove excess sign
face |
|
If you have allowed additional sign
face, now trim the excess off to the outer edge of the frame. Place the
knife into the alum section and slide knife along slot to provide a safe
cut. This excess allows the sign face to be removed and reused at a latter
date.
|
|
|
|
|
Installing the caps |
|
The caps have been trimmed or filed at
the extreme points of the mitre to allow a small amount of movement in the
cap relative to the base. Align the corner while placing pressure on the
cap.
|
|
|
|
|
Installing the cap
technique |
|
To quickly align the cap to the base try
marking the back edge with a saw cut, scribed line or marker pen. This
will assist on large frames as you can work from the middle of the frame
out. Single installers with like this time saver!
|
|
|
|
|
Closing the cap |
|
Using either hand pressure or a rubber
mallet start at one end of the cap and move along to the middle, then to
the other end of the frame.
|
|
|
|
|
Removing the cap |
|
The Clips-in tool provide the sign user
an effective method of removing the cap. The front edge of the “clip”
hooks under the lip of the cap where it touches the sign face. The angled
part of the handles groove “hooks” onto the rear of the base. The
action is a steady pull away from the back of the frame. The tool applies
horizontal pressure to the cap releasing the trigger.
|

|
|
|
|
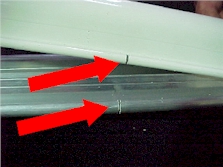
Resistance in the
cap |
|
The closing off the cap must be a smooth
unrestricted movement. If you encounter any resistance make sure the cap
is located in the base to form a free moving hinge.
|
|
|
|
|
Face positioning
tips |
|
In addition to double sided tape we
suggest various proven methods to make your face install easy.Plastic
clips and mini caps are detailed next.
|
|
|
|
|
Face positioning
plastic clips |
|
Plastic face clips can be fashioned from
plastic off-cuts, these simple clips can save time and simplify on site
installations. By inserting the clip into the rear of the base section
allowing the sign face stock to overlap the outside of the frame. Clip
into the rear fin against the grooves.
|
Recommended size is
36X36mm (1”3/8”x1”3/8”)
|
|
|
|
Face positioning
mini caps |
|
Small sections of cap can assist when
installing long sign faces. They can act as mini clips placed in positions
as a temporary holder.
|
Recommended size is 75mm (3”) long, use
off-cut cap. This size fits in your pocket easy.
|
|
|
|
Face positioning
tips “Vertical” |
|
Install the frame on a wall or the like,
then remove liner off double sided tape. Place sign face on the tape,
working around the sign face take up the wrinkles by pulling the sign face
outward to edge of frame.
|
|
|
|
|
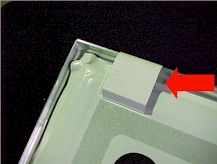
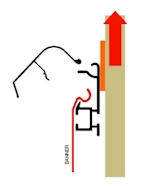
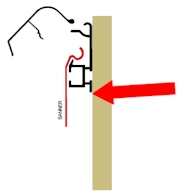
Installing large
frames single handed |
|
When installing large oversize frame
make up 75x75x1.6mm (3x3x1/16”) alum plates with holes. Screw to the
rear of the frame with counter sunk screws. These plates can be used to
rope of to and hoist the frame into position from the roof. When frame is
in position, remove cap,fix with suitable fixing and replace cap. Then the
escutcheon plates can be snapped off or left.
|
|
|
Use escutcheon to lift sign in to position, remove
rope. |
|

|
Use escutcheon for fixing or snap off. |
|
|
|
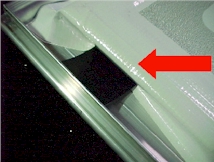
Hiding your fixings under the cap |
| The allowance of space inside the section give the
opportunity to hide your selected fixings. Remove cap from frame, then
install suitable fixing inside cavity. You will notice we have placed a
slight groove into the section for ease of alignment of fixings. |
|
|
|
|
Installing large
frames |
|
When installing large oversize frame to
difficult surfaces try using a suitable right angle alum section fixed to
the wall at the desired height. This allows the frame to be “hung” on
the now concealed bracket using a suitable fixing.
|
|
|
|
|
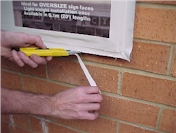
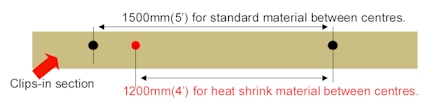
Fixing tips |
|
When fixing the frame on site use
appropriate fixings through pre drilled holes. Fix every 1500mmm (5’) or
less for flexible sign faces or every 1200mm (4’) or less for heat
tensioned materials.
|
|
|
|
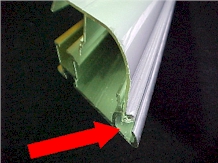
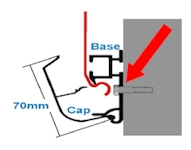
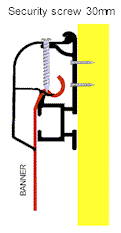
Security Fixing of Clips-in cap |
|
When installing large clips-in frames you will need to
ensure the cap is securely fixed to the base to ensure long term tension
of the sign face. On the back of the cap there is a groove in the
extrusion by installing a 30mm (13/8") screw through the cap, into
the base as shown this locks the cap in position. We recommend this for
sites where access may be a problem if maintenance is required.
|
|
